





Photobucket Photobucket Photobucket Photobucket Photobucket Photobucket Photobucket Photobucket

Sunday

Life of Pie


That's right. I made A Life of Pi Pie. Or to make it a bit simpler let's just call it A Life of Pie. I was so proud of it I actually did a little dance around my kitchen once I was done. And as there was no one home I made Posy and the cats and even Gary the tortoise admire it for a full 10 minutes before they returned to their busy schedule of sniffing things and pretending not to have been fed. 

If you don't understand the reference or just simply don't understand how I could be this much of a geek I made the pie to celebrate not only the brilliant film that is 'The Life of Pi' but also to celebrate the fact that it's the Bafta's tonight! There is quite literally nothing I like more than an award ceremony and an award ceremony that actually starts at a reasonable hour! Well that's just too much. A few weeks ago I stayed up till 5 in the morning to watch the Golden Globes which was kind of worth it but also kind of totally not worth it at the same time... Anyway as you can see I'm very excited! And when I'm excited I like to bake. Life of Pi was one of my favourite films of the year, I've tried to see all the Oscary films this year and I think in the end Life of Pi and Silver Linings Playbook were my favourites. But it's harder to come up with a Silver Linings Playbook themed dessert, so I just settled with Life of Pie. For anyone that hasn't seen it, this picture might explain. And yes, I know there's no sail, but without a sail my 'boat' just looked like a mouldy pea pod...


I used a recipe I saw on A Beautiful Mess for Buttermilk and Honey Pie. The only reason I went for it was because I actually had some buttermilk in the fridge which basically never happens! So I got all over excited and made this. I used Agave Syrup instead of honey because I'm not a huge fan of the actual taste of honey and it turned out really well! I decided to make mine 'Halfway Homemade' as well and I bought some mini pastry shells from M&S as well as a big one. The recipe made enough filling for a big pie and 6 mini pies so I ended up with kind of a lot of pie! I probably shouldn't say this but buying ready made pastry shells was amazing! The whole thing took about 5 minutes and the result was probably yummier! 


Life of Buttermilk and Honey Pie Recipe.

Ingredients:
- 3 eggs,
- 150g caster sugar (2/3 cup)
- 1/2 cup of honey or agave syrup. 
- 2 tbsp plain flour.
- 1 cup of buttermilk.
- 1 tsp vanilla extract. 

Step One - Whisk the eggs with the sugar and honey and stir in the other ingredients. 
Step Two - Pour into store bought pie crus (or homemade!) and bake at 174C (350F) for 40 minutes (the mini pie's took 20 minutes) or until the sides are golden brown and the pie is set (it will still have a slight jiggle at the centre). 
Step Three - While your waiting for your pie to cool make a little boat! I made the boat and the rubber ring out of black fondant (available from Waitrose) and then I stuck a cocktail stick into the boat with a sail shaped sticker attached. I drew the line with writing icing. 

If you decide to make your own Life of Pie (remember, it could be any pie!) for tonight please tweet me a picture and also if you come up with any Bafta movie related food puns. My only other idea was Argo Fro-Yo but I'm not sure how to make frozen yogurt... 

Lots of Love Scarly x 


Tuesday

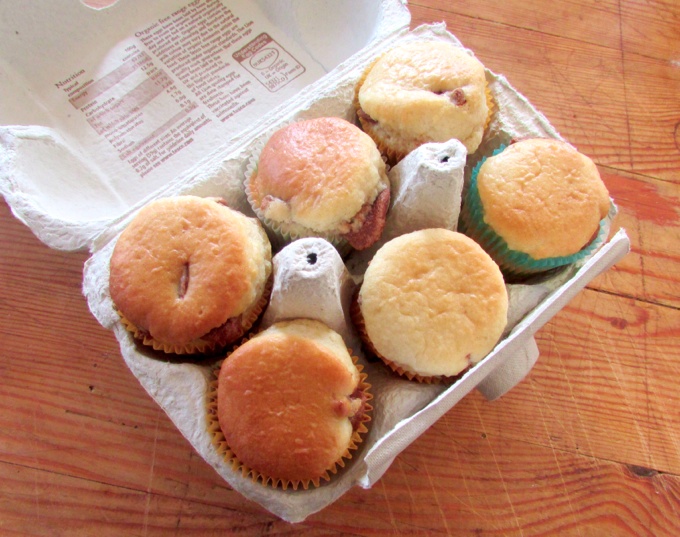
Muffins in an Egg Carton


Hello, first off and before I begin gushing about mini muffins, I just want to say how incredibly shocked and overwhelmed I was at the reaction to my last post. Something I didn't mention in it was that one of the things I have been finding scary recently is communicating with people on line. Sometimes I find the pressure of twitter and my blog just a bit too much and even though I know in reality there isn't any pressure at all, I have been having trouble with both of these things. But the loving, kind and thoughtful tweets and comments I got from people has completely renewed my faith that online people can be just as nice and in fact usually nicer than real life people. Now, back to the muffins. 

Last Sunday I decided to bake some muffins. I'm doing a baking themed project in my design and technology lessons and it requires me to find as many liquid based recipes as possible. That's obviously not the whole project because that would be the single oddest homework in history, but it is included. I found the recipe for the muffins here and it was the first muffins I've made that had a properly liquid batter. This made them very easy to pour and they were also very yummy. Wow, I can't believe I just said 'liquid batter'. That's pretty extreme...

Anyway I decided to make them mini because, well everything's just better when it's mini, and I cut out the walnuts because my little brothers hate nuts. I'd finished the muffins, they were cooling cool-y on the cooling rack and I began wondering what to do with them now. No one was home and I had a dozen mini muffins and nowhere to take them. Storing and presenting baked goods is one of the bains of my life. No jokes. I hate Tupperware and I can just never figure out what to do with everything I bake!

So, there I was, once again faced with the dilemma of storing my muffins, and then it hit me... AN EGG CARTON! I emptied out the eggs and held my breath, but guess what? The muffins fit! And they looked so cute, in fact they almost looked too cute. 


As you can tell I was pretty proud! They didn't stay fresh for that long but they looked so good that it really didn't matter! 


I hope everyone is having a lovely day/week/January even though I know that's not exactly possible! 

Lots of Love Scarly xx

Sunday

Where Have I Been - Take 2.

Hello (blows dust of blog and tries to bring it back to life), if you read my blog regularly you'll know that I haven't updated it in a few weeks. Primarily, yes, this was to do with Christmas which I am still desperately mourning. I found one of my Christmas jumpers the other day and it nearly brought tears to my eyes (I say nearly, I'm not completely crazy!). We had a really lovely Christmas and there were 30 of us for Christmas lunch which was very loud and fun.

If you've read my blog before, especially this post, you will know that for the last few years I haven't been very well. It was all to do with my back and was very complicated and sad and boring but I was essentially ill for nearly three years. In May I had an operation to try and fix things and the amazing and unbelievable news is that the operation worked and I have been getting better ever since. I've started a new school which I love and I feel like I'm making progress. I always said to myself when I was ill that if I ever got better I would be the happiest person in the world, and while I am more happy than I can express, I didn't realise quite how hard the actual 'getting better' part was going to be. I had been locked away in a little bubble for 3 years and everything still feels very new and scary. Sometimes I'll have a week where I feel like everything's so great and then I'll get completely freaked out by taking the tube or my back will start hurting again and I'll feel like nothings changed. But things have changed! Which is why I feel like my blog needs to change as well.

I have always tried to keep my blog pretty un-personal and while I was sick this made sense. I didn't like 'sick me' and my blog was a sort of way of pretending none of it was happening. But now that I'm getting better I think I want to start sharing that more online. I'm still going to be doing a lot of stuff about knitting, Twit-Knit and baking (no matter how much better I get these are all still very important) but maybe also some more things about what I've been up to, things I'm doing to try and make me less scared of the world as well as some more reviews of books and movies. I might even start doing some videos although this does seem incredibly scary! I don't know if anyone even wants to hear this stuff but I think it might be worth a try.

I hope everyone is having a great January. I think people are still working on their Twit-Knit scarves so I'm going to wait a bit before properly finishing it but it's been very fun and exciting and I can't wait to put together all the pictures!

Have a lovely day and a lovely month and hopefully see you (through the internet) very soon!
Scarlett.

Saturday

10 Days To Go - The Empty Stocking


If there's two things I love in this world (apart from knitting and dogs and cats and all that other stuff I love), it's Christmas and books! So when my Dad decided to write a Christmas book I was pretty excited! When I found out Rebecca Cobb was going to illustrate it I was just  a little bit more excited and when I found out it was my job to make a cake for the launch party I was pretty much over the moon. 

I may be a tiny bit bias what with it being written by my Dad and the fact that I would pretty much love any book if it had a sparkly Christmas tree on the front, but the book is very good! It's about two twins at Christmas and I'm not going to give away the ending up it does end very happily (can you imagine a kids book with a sad ending!). Anyway the story is very good, the illustrations are amazing and if you are buying a present for a child this Christmas I would most definitely recommend (or you could just pretend you were buying it for a child and buy it for yourself!)

I made the cake a few weeks ago when the book came out and we all carried it down to our lovely local book shop (Lutyens and Rubinstein) and ate the cake while reading the book! I would love to say I hand carved the cake myself but that would be a lie, I had a book shaped cake mould (please don't ask why, I honestly have no idea!) which you can buy here. I made a plain white cake and covered it with jam and white fondant icing. Then I used cake pens (if you don't own these already, please ask for some in your stocking!) to draw the illustrations and writing on the cake. My favourite bit was the pages on the sides I think, and the lopsided tree! You can see more pictures below. 

Here is the link to the book on amazon however if you do get the chance to buy it in a book shop please do! Because book shops are amazing and amazon isn't! 

I hope everyone is having a lovely Christmassy weekend and enjoying the weather. 
Lots of Love Scarly x


Wednesday

12 Days To Go - Baker Ross Christmas Activity Pack!


A few weeks ago the lovely people at Baker Ross (an awesome kids arts and craft supplies shop) got in touch with me and asked if I would like to create a recipe for their Christmas Activity Pack eBook. I, of course, said yes and after much pondering I decided to create an extremely easy but extremely tasty recipe for Celebration Chocolate Rocky Road. In case the title doesn't give it away it's basically rocky road with a whole box of chopped up celebrations thrown in, and it's very yummy!

The eBook is free and contains lots of other fun crafty activities and recipes. If you have kids, if you are a kid or if you still think your a kid I would definitely recommend downloading it!

You can download it by clicking HERE.

And in case you weren't already sold, here's a picture of the rocky road...


Lots of love Scarly!

Monday

15 Days To Go - Black Forest Gateau


Hello! I'm back. And I know I've missed a few days of my calendar. But apparently there's this thing called English coursework and it's just a tiny bit more important than knitting... and no where near as fun. But I did bake a black forest gateau, and it was pretty awesome and very easy to make and I think probably very alchoholic due to the mountain of kirche cherries. Unfortunately I didn't even get to try it because I made it for a dinner party of my mum's and when I came down stairs there was not a crumb left! So I'm guessing it was nice... or horrible... and they threw it in the bin. One can't be sure. 

I found the recipe here and it was very good and easy to follow, it was also good because you didn't need an electric mixer to make it! 

It's 15 days till Christmas and I'm more excited than I thought I'd be... and I thought I'd be pretty excited. I'm dressing up as Father Christmas tomorrow for the lower school which I feel may be my future career. 

I hope everyone else is getting Christmassy and remember to send me photos of your Twit-Knit's ! 

Love Scarlett x


Tuesday

21 Days to Go - D.I.Y. Mistletoe Hat


Yesterday I showed you my kind of Christmas headwear and today I want to share with you my brothers idea of a Christmas hat. I like to think I'm the crafty one in the family but when my 15 year old brother came running up to me to ask me to make this for him I couldn't help but be impressed. 

The basic concept of the mistletoe hat is that you sew a piece of mistletoe onto a hat and walk around all day making people kiss you. I know, it's genius, I'm extremely jealous it wasn't my idea. 


To sew the mistletoe onto the hat I used a large yarn needle and a pice of green yarn. Make sure you do at least one loop on the little branchy things that come out of the main one as it won't slip out. The good thing about using yarn is that it's thick so you can just snip it off whenever you're done kissing. 


Happy Christmas!
Love Scarly x


Monday

22 Days to Go - D.I.Y. Holly Headband


You probably already know this but I love a good headband. I'm not talking Blair Waldorf preppy headband I'm talking full on comic  head band. At Easter I wear bunny ears, on my birthday I wear Deely Boppers and I wear a headband with cat ears on pretty much every other day of the year. But of all the festive headbands, Christmas headbands are my favourites. I made this holly headband after watching Nativity 2 (on the first day it came out, OBVIOUSLY) which featured an extremely enviable supply of Christmassy headbands. This holly headband is very easy to make and is guarenteed to turn heads (okay fine, maybe not for the right reasons, but let's just pretend okay!)

You will need:
- a hard headband
- green felt
- red felt
- glue gun

Step One: Cut 2 leaves and 2 berry's out of the felt. Follow the pictures above as a guide. 

Step Two: Glue the 2 leaves onto the headband using your glue gun and then glue to the 2 berries on. 

Step Three: Wear your headband with confidence and style!


Merry Christmas! 
Love Scarly x

Sunday

23 Days to Go - Knit Relief Posting Tips


Hello! Today something very exciting happened. Something very exciting indeed. I received a package in the mail. And inside this package was my first Twit-knit scarf piece. And I was so excited that I did a little dance around the hallway. And my brother thought I was going crazy. But I wasn't. I was just EXTREMELY happy. Not only was the piece, knitting by the extremely talented @mdhilary, very beautiful but it also came with a Christmas stamp AND a little Christmas card. So it was basically like getting an early visit from Father Christmas except it was even better because it included knitting. 


The package from Hilary was so perfect that it reminded me of a few tips to give everyone for when they are posting their scarf pieces. I haven't posted yet as I'm still busy knitting (it turned out coursework was actually just the tiniest bit more important than knitting, although I'm not sure why!) but I hope lots of people have begun sending off their pieces.

Here are a few tips for sending your pieces (inspired by Hilary)
1. Tie up the ends, don't sew them in - when it comes to sewing our scarves together it's going to be so much easier if we can just use the casted on and off ends. Also this saves you the hastle of sewing them in yourself. As you can see Hilary tied hers up into lovely little bows and make sure you leave a long trailing bit of yarn as you cast off.
2. Include a sticky label with your address on - this was also Hilary's idea, and it's very clever! 
3. Don't stress about it! - If you're anything like me you will already be getting into a panic about how to send them, where the post office is, if the pieces are good enough and where on earth you left your pen! But just remember - it's Christmas, we are knitting, everything is great! 

I hope these tips have helped and remember to email or tweet me any pictures of your scarves/pieces!

Lots of Love Scarly x

Polaroid Advent Calendar D.I.Y.


Hello :) Today is officially the 25th of November (I guess it would be kind of odd if it was unofficially the 25th of November) which means we can start getting SUPER excited about Christmas. I have obviously been getting excited about Christmas since about June but now I think it's finally early enough to start talking about it.

With only 5 days till Advent begins I thought I would share this easy but awesome advent calendar D.I.Y. I got my mini Polaroid camera for my birthday last year and I'm absolutely obsessed. So I've decided that every day of December I'm going to take a Polaroid of something Christmassy I've been doing that day and peg it up on my advent calendar. I guess that kind of makes it a reverse advent calendar but it's still going to be very cool even if it is marginally less tasty than a chocolate calendar. 

It will mean that I HAVE to do something Christmassy every day of December and also that I have a brilliant collage of Christmas by the end of the month. 

If you want to make your own Polaroid advent here is how, it takes about 20 minutes and you can pin it up on your wall for instant Christmassyness. 


You will need: A pin board, some wrapping paper, 25 wooden clothes pegs, some number stamps and ink, some scissors, double sided sticky tape, a polaroid camera, 3 packs of polaroid film. 


Step One: Pin your wrapping paper to your pin board and then stick the pegs on with double sided sticky tape. If you make it with a polaroid on hand you can make sure that the pegs are correctly spaced. My board wasn't long enough so I put the last row of pegs right at the bottom and this means the polaroids will hang off the bottom which still looks pretty cool! 


Step Two: Stamp your numbers (1-25, incase you forgot) next to the pegs. If you don't have number stamps you can of course just write them in pen. 


Step Three: Pin your board up on the wall and your done! Now all you have to do is take a polaroid every day and peg it in the correct place. I tested mine out with this silly picture of my brothers and it works pretty well! 


Good Luck! And leave a comment if you have any problems.

Love Scarly x


Monday

Knit Tips - Blocking


Hello Twit-Knitters (and normal knitters, of course) I have another Knit Tip today and this time it's how to block your pieces. There's been a lot of talk on twitter about blocking and everyone does it a bit differently but I thought I would share how I do it for anyone that's interested. 

Blocking is an easy technique used to stretch and flatten knitting into the desired shape. It stops that annoying curling on the sides and if your piece is slightly smaller than you intended you can slightly stretch it into the desired size.

Many people steam iron their knitting but I prefer to do this way as it's so easy and also I'm slightly scared of the iron! 

You will need: A towel, your piece of knitting and some sewing pins.

How to block your knitting: 
1. Lay your towel out flat on the floor. Lightly wet your knitting, making it damp but not dripping. It will seem very weird to run your beautiful knitting under the tap but trust me, it works! 
2. Lay your knitting on top of your towel and gently stretch it into the desired dimensions. If your working towards a pattern it might helpt to have a tape measure on hand to check your measurements. 
3. Pin your knitting to the towel and leave it till it dries. 

I hope this has been helpful and leave a comment if there are any other Knit-Tips you've been needing! Also, if you are in Twit-Knit, make sure you email or tweet me any pictures of your scarf sections so far so I can arrange another post! 
There's no rush yet but I'd say everyone should be aiming to have finished their second or third pieces by now! I know some people have already finished which is very impressive but don't worry if your not that fast! It's getting colder so there will be plenty of knitting opportunities coming up!

Lots of love Scarly x 


Sunday

My First Interview


Interviewing people is something I've always been very fascinated/very afraid of so when I was asked  to interview Willa Doss, creator of a new teen skincare brand 'Willa' for Get the Gloss I was a mixture of terrified and extremely excited. Little did I know that Willa Doss is only 12! That's right, at the grand old age of 12 Willa has created her own incredibly successful line of face washes, body creams and lip gloss (my favourite, obviously) that has just launched exclusively in Harrods. She was incredibly nice and the interview was no where near as scary as I thought it would be. You can read all about it HERE on Get the Gloss. Happy Sunday, Love Scarlett x

Monday

Smores Rocky Road Recipe


I know this might sound wierd to some people but for the first 13 years of my life I had no idea what smores were. I would hear people talking about making smores and had absolutely no idea what they were. Then on a camping trip I had my first ever smore and everything changed. Okay, to be honest not that much changed. But it was very yummy. For anyone else who's still in the smores dark, smores are basically a sandwich of biscuit, chocolate and marshmallow which you can melt together while camping to make one lovely gooey chocolaty yummy thing. 

This rocky road recipe combines all the loveliness of smores, plus toasted almonds. Using marshmallow fluff instead of actual marshmallows means it stays soft and gooey in the middle even after you put it in the fridge! 

Ingredients: 
- 8 graham crackers (or if you cannot find them, good old digestive biscuits will do fine)
- 1 1/2 cups of almonds, toasted and chopped. (to find out how to toast almonds, click here, it's v easy!)
- 1 cup of marshmallow creme, (I used fluff) 
- 340g of chocolate chips. 
- 1 can of condensed milk. 


Step One: Preheat the oven to 190C. Line a 9x13inch baking tray with baking paper. Then line the tray with the graham crackers. Bake for about 8 minutes until biscuits are lightly toasted. 
Step Two: Roughly crush the biscuits into large crumbs and then toss with the almonds in the bottom of the tray. 


Step Three: Dollop the marshmallow creme on top of the biscuits. 
Step Four: In a heatproof bowl set over a pan of boiling water, melt the chocolate and condensed milk, stirring occasionally until the chocolate is melted and the mixture is smooth. 


Step Five: Pour the mixture over the marshmallow creme and use a knife to swirl the mixture with the creme and the biscuits and the almonds. 


Step Six: Refrigerate until set (about 2 hour) and then cut into small pieces. 


You should end up with a lovely chocolaty marshmallow mixture over a bed of crushed biscuits and almonds.

Happy Monday! I have parents evening tonight, SCARY! 

Love Scarlett x. 


Thursday

Knit-Tips: Moss Stitch

Hello. Seeing as how everyone is getting so into their knitting for the Twit-Knit Scarf Swap and has been trying out so many amazing different stitches I thought I would do a few more knitty posts on my blog. It seems that a lot of the twit-knitters are very advanced and good at lots of complicated stitches (for the record, I'm not!), so probably already know this one, but for those who aren't so experienced I thought I would share one of my favourite knitting stitches, the moss stitch.

But before I get started I just want to say how moved I was by everyones lovely responses to the last post! I love Twit-Knit so much and I feel like we have created such a lovely little twitter-community.

Okay now, on with the stitch, this stitch really is VERY easy to remember and there are only really three steps you need to remember. I like it so much because I think the textures so awesome and you can never really get your head around it as long as you look at it.


How to do Moss stitch (sometimes called seed stitch):

CAST ON: an even amount of stitches. 
ROW ONE: Knit 1, Purl 1, repeat this until the end of the row.
ROW TWO: Purl 1, Knit 1, repeat this until the end of the row.

See! I told you it was easy, and the results are amazing and it always looks much more complicated than it actually was.

Happy knitting and tweet me if you decide to use moss stitch as well!

Love Scarlett.

Tuesday

Twit-Knit Scarf Swap Update

Before I start this post I just want to say how sorry I am it's so late. I know I promised to update regularly but I'm afraid I've been slightly overwhelmed with coursework and holiday (okay maybe that one wasn't so overwhelming) and this is my first Twit-Knit Scarf Swap update post.

Lateness of the post aside the scarf swap is going VERY well. As I said before I was blown. away. by how many people are taking part (it's around 70!) and was slightly scared that everyone would forget and it would all be a disaster. But (touch wood) it's going very well and everyone seems to be making friends and doing some amazing knitting.

I wasn't sure what level everyone would be at and thought we might just end up with 70 garter stitch scarves in different colours. But the opposite turns out to be true! Everyone is so amazing and is doing all kinds of crazy patterns and cables. Having said this if you are just doing garter don't worry at all! I'm definitely going to end up doing it for a few of mine! And you can always add buttons or beads at the end.

If you have any problems or worries please just email me, but for now, here is how Twit-Knit is getting on so far...

These are the lovely people who have written about the project on their blogs:

1. Emma Mitchell wrote about Twit-Knit and her amazing knitted leaf on her lovely blog Silver Pebble. 

2. Emma Pooley wrote about her five finished squares (I know, she's amazing, but don't panic if you aren't that far along) on her blog The 39 Stitches. 

3. @bakebakegirl wrote a LOVELY post about Twit-Knit on her blog The Original Bake Bake Girl

And here's how everyone else is getting along...

All these lovely squares are by Hilary Packham for Team Sleigh.

1. @haylowbabe's first amazing square. 2. A lovely red flower by @nicnicolanic for Team Cracker. 3. And some more beautiful multi-coloured flowers by @pencrug for Team Cracker.

1. @bakebakegirl's first square for Team Turkey. 2. Lovely knitting by @faithyb33.

1. @JoanneHoyles awesome rainbow square for Team Present. 2. @_Sarah232's diamond stitch for Team Sleigh. 

1. Mock cable by @sharonmacbeth for Team Sleigh. 2. Amazing fair isle by @Mhairigirl for Team Present

1. Three awesome pocketed squares by @JennyJHoward for Team Stocking 2. Some beautiful squares by @slightlyturquoise.

1. An early picture of @paulahall75's squares for Team Nativity (she's already posted 3!). 2. Another lovely piece by @slightlyturquoise. 

1. @sharonmacbeth's awesome 2 different coloured piece for Team Sleigh. 2. @louisefcampbell's beautiful purple and green square.

Love Scarlett. 

Related Posts Plugin for WordPress, Blogger...