Photobucket Photobucket Photobucket Photobucket Photobucket Photobucket Photobucket Photobucket
Showing posts with label Baking. Show all posts

Sunday

Life of Pie


That's right. I made A Life of Pi Pie. Or to make it a bit simpler let's just call it A Life of Pie. I was so proud of it I actually did a little dance around my kitchen once I was done. And as there was no one home I made Posy and the cats and even Gary the tortoise admire it for a full 10 minutes before they returned to their busy schedule of sniffing things and pretending not to have been fed. 

If you don't understand the reference or just simply don't understand how I could be this much of a geek I made the pie to celebrate not only the brilliant film that is 'The Life of Pi' but also to celebrate the fact that it's the Bafta's tonight! There is quite literally nothing I like more than an award ceremony and an award ceremony that actually starts at a reasonable hour! Well that's just too much. A few weeks ago I stayed up till 5 in the morning to watch the Golden Globes which was kind of worth it but also kind of totally not worth it at the same time... Anyway as you can see I'm very excited! And when I'm excited I like to bake. Life of Pi was one of my favourite films of the year, I've tried to see all the Oscary films this year and I think in the end Life of Pi and Silver Linings Playbook were my favourites. But it's harder to come up with a Silver Linings Playbook themed dessert, so I just settled with Life of Pie. For anyone that hasn't seen it, this picture might explain. And yes, I know there's no sail, but without a sail my 'boat' just looked like a mouldy pea pod...


I used a recipe I saw on A Beautiful Mess for Buttermilk and Honey Pie. The only reason I went for it was because I actually had some buttermilk in the fridge which basically never happens! So I got all over excited and made this. I used Agave Syrup instead of honey because I'm not a huge fan of the actual taste of honey and it turned out really well! I decided to make mine 'Halfway Homemade' as well and I bought some mini pastry shells from M&S as well as a big one. The recipe made enough filling for a big pie and 6 mini pies so I ended up with kind of a lot of pie! I probably shouldn't say this but buying ready made pastry shells was amazing! The whole thing took about 5 minutes and the result was probably yummier! 


Life of Buttermilk and Honey Pie Recipe.

Ingredients:
- 3 eggs,
- 150g caster sugar (2/3 cup)
- 1/2 cup of honey or agave syrup. 
- 2 tbsp plain flour.
- 1 cup of buttermilk.
- 1 tsp vanilla extract. 

Step One - Whisk the eggs with the sugar and honey and stir in the other ingredients. 
Step Two - Pour into store bought pie crus (or homemade!) and bake at 174C (350F) for 40 minutes (the mini pie's took 20 minutes) or until the sides are golden brown and the pie is set (it will still have a slight jiggle at the centre). 
Step Three - While your waiting for your pie to cool make a little boat! I made the boat and the rubber ring out of black fondant (available from Waitrose) and then I stuck a cocktail stick into the boat with a sail shaped sticker attached. I drew the line with writing icing. 

If you decide to make your own Life of Pie (remember, it could be any pie!) for tonight please tweet me a picture and also if you come up with any Bafta movie related food puns. My only other idea was Argo Fro-Yo but I'm not sure how to make frozen yogurt... 

Lots of Love Scarly x 


Tuesday

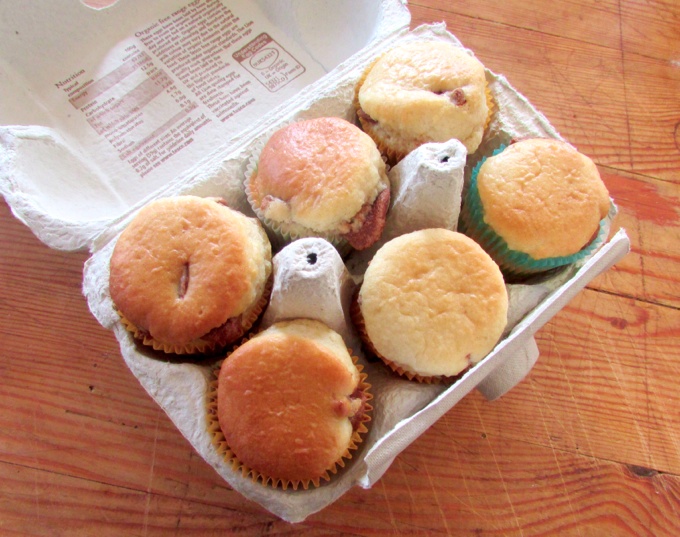
Muffins in an Egg Carton


Hello, first off and before I begin gushing about mini muffins, I just want to say how incredibly shocked and overwhelmed I was at the reaction to my last post. Something I didn't mention in it was that one of the things I have been finding scary recently is communicating with people on line. Sometimes I find the pressure of twitter and my blog just a bit too much and even though I know in reality there isn't any pressure at all, I have been having trouble with both of these things. But the loving, kind and thoughtful tweets and comments I got from people has completely renewed my faith that online people can be just as nice and in fact usually nicer than real life people. Now, back to the muffins. 

Last Sunday I decided to bake some muffins. I'm doing a baking themed project in my design and technology lessons and it requires me to find as many liquid based recipes as possible. That's obviously not the whole project because that would be the single oddest homework in history, but it is included. I found the recipe for the muffins here and it was the first muffins I've made that had a properly liquid batter. This made them very easy to pour and they were also very yummy. Wow, I can't believe I just said 'liquid batter'. That's pretty extreme...

Anyway I decided to make them mini because, well everything's just better when it's mini, and I cut out the walnuts because my little brothers hate nuts. I'd finished the muffins, they were cooling cool-y on the cooling rack and I began wondering what to do with them now. No one was home and I had a dozen mini muffins and nowhere to take them. Storing and presenting baked goods is one of the bains of my life. No jokes. I hate Tupperware and I can just never figure out what to do with everything I bake!

So, there I was, once again faced with the dilemma of storing my muffins, and then it hit me... AN EGG CARTON! I emptied out the eggs and held my breath, but guess what? The muffins fit! And they looked so cute, in fact they almost looked too cute. 


As you can tell I was pretty proud! They didn't stay fresh for that long but they looked so good that it really didn't matter! 


I hope everyone is having a lovely day/week/January even though I know that's not exactly possible! 

Lots of Love Scarly xx

Saturday

10 Days To Go - The Empty Stocking


If there's two things I love in this world (apart from knitting and dogs and cats and all that other stuff I love), it's Christmas and books! So when my Dad decided to write a Christmas book I was pretty excited! When I found out Rebecca Cobb was going to illustrate it I was just  a little bit more excited and when I found out it was my job to make a cake for the launch party I was pretty much over the moon. 

I may be a tiny bit bias what with it being written by my Dad and the fact that I would pretty much love any book if it had a sparkly Christmas tree on the front, but the book is very good! It's about two twins at Christmas and I'm not going to give away the ending up it does end very happily (can you imagine a kids book with a sad ending!). Anyway the story is very good, the illustrations are amazing and if you are buying a present for a child this Christmas I would most definitely recommend (or you could just pretend you were buying it for a child and buy it for yourself!)

I made the cake a few weeks ago when the book came out and we all carried it down to our lovely local book shop (Lutyens and Rubinstein) and ate the cake while reading the book! I would love to say I hand carved the cake myself but that would be a lie, I had a book shaped cake mould (please don't ask why, I honestly have no idea!) which you can buy here. I made a plain white cake and covered it with jam and white fondant icing. Then I used cake pens (if you don't own these already, please ask for some in your stocking!) to draw the illustrations and writing on the cake. My favourite bit was the pages on the sides I think, and the lopsided tree! You can see more pictures below. 

Here is the link to the book on amazon however if you do get the chance to buy it in a book shop please do! Because book shops are amazing and amazon isn't! 

I hope everyone is having a lovely Christmassy weekend and enjoying the weather. 
Lots of Love Scarly x


Wednesday

12 Days To Go - Baker Ross Christmas Activity Pack!


A few weeks ago the lovely people at Baker Ross (an awesome kids arts and craft supplies shop) got in touch with me and asked if I would like to create a recipe for their Christmas Activity Pack eBook. I, of course, said yes and after much pondering I decided to create an extremely easy but extremely tasty recipe for Celebration Chocolate Rocky Road. In case the title doesn't give it away it's basically rocky road with a whole box of chopped up celebrations thrown in, and it's very yummy!

The eBook is free and contains lots of other fun crafty activities and recipes. If you have kids, if you are a kid or if you still think your a kid I would definitely recommend downloading it!

You can download it by clicking HERE.

And in case you weren't already sold, here's a picture of the rocky road...


Lots of love Scarly!

Monday

15 Days To Go - Black Forest Gateau


Hello! I'm back. And I know I've missed a few days of my calendar. But apparently there's this thing called English coursework and it's just a tiny bit more important than knitting... and no where near as fun. But I did bake a black forest gateau, and it was pretty awesome and very easy to make and I think probably very alchoholic due to the mountain of kirche cherries. Unfortunately I didn't even get to try it because I made it for a dinner party of my mum's and when I came down stairs there was not a crumb left! So I'm guessing it was nice... or horrible... and they threw it in the bin. One can't be sure. 

I found the recipe here and it was very good and easy to follow, it was also good because you didn't need an electric mixer to make it! 

It's 15 days till Christmas and I'm more excited than I thought I'd be... and I thought I'd be pretty excited. I'm dressing up as Father Christmas tomorrow for the lower school which I feel may be my future career. 

I hope everyone else is getting Christmassy and remember to send me photos of your Twit-Knit's ! 

Love Scarlett x


Smores Rocky Road Recipe


I know this might sound wierd to some people but for the first 13 years of my life I had no idea what smores were. I would hear people talking about making smores and had absolutely no idea what they were. Then on a camping trip I had my first ever smore and everything changed. Okay, to be honest not that much changed. But it was very yummy. For anyone else who's still in the smores dark, smores are basically a sandwich of biscuit, chocolate and marshmallow which you can melt together while camping to make one lovely gooey chocolaty yummy thing. 

This rocky road recipe combines all the loveliness of smores, plus toasted almonds. Using marshmallow fluff instead of actual marshmallows means it stays soft and gooey in the middle even after you put it in the fridge! 

Ingredients: 
- 8 graham crackers (or if you cannot find them, good old digestive biscuits will do fine)
- 1 1/2 cups of almonds, toasted and chopped. (to find out how to toast almonds, click here, it's v easy!)
- 1 cup of marshmallow creme, (I used fluff
- 340g of chocolate chips. 
- 1 can of condensed milk. 


Step One: Preheat the oven to 190C. Line a 9x13inch baking tray with baking paper. Then line the tray with the graham crackers. Bake for about 8 minutes until biscuits are lightly toasted. 
Step Two: Roughly crush the biscuits into large crumbs and then toss with the almonds in the bottom of the tray. 


Step Three: Dollop the marshmallow creme on top of the biscuits. 
Step Four: In a heatproof bowl set over a pan of boiling water, melt the chocolate and condensed milk, stirring occasionally until the chocolate is melted and the mixture is smooth. 


Step Five: Pour the mixture over the marshmallow creme and use a knife to swirl the mixture with the creme and the biscuits and the almonds. 


Step Six: Refrigerate until set (about 2 hour) and then cut into small pieces. 


You should end up with a lovely chocolaty marshmallow mixture over a bed of crushed biscuits and almonds.

Happy Monday! I have parents evening tonight, SCARY! 

Love Scarlett x. 


Tuesday

Halloween Baking


With only a few hours left till Halloween (YAY!) I thought I'd share some fun Halloween baking I've been doing recently. First I had to make some Scream Cheese Brownies. I found the recipe on the Betty Crocker website. Like my pumpkin cupcake recipe, this one's also a bit of a cheat as it uses brownie mix, but the results are so awesome that I definitely don't care at all!  


Then, to make the brownies EVEN MORE awesome I turned them into Marshmallow ghost brownies using another Betty Crocker method. This is one of the easiest but most effective cake decorating methods I've ever used and I loved how the spooky little brownies turned out. Unfortunately once I'd finished the brownies and left them out on a cake stand for everyone to see, my extremely fat cat Badger came along and decided what he really felt like for dinner, much more than catfood, was 8 little marshmallow ghosts. I think it's safe to say that the ghosts met with a pretty terrifying end. I just hope they gave him scary nightmares to pay for his horrid crime. 


I'm going to my first Halloween party in three years tomorrow! Which is pretty scary but also kind of exciting. I'm dressing up as a cat which I KNOW sounds boring but I think I'm gonna make it pretty awesome (hopefully). I'll be doing a round up of all my Halloween posts tomorrow so check back for some fun ideas. In the morning me and a friend are cycling to a shop to buy pumpkins and then coming home to carve them which will be fun/disgusting (I secretly always kinda hate carving pumpkins)

I hope everyone has a very happy Halloween!
Lots of Love Scarly. 

The Perfect Chocolate Chip - Milk Chocolate and Walnut


Continuing on with the theme of perfect chocolate chips I am following the white chocolate and cranberry recipe with this milk chocolate and walnut one. I took the biscuits in last week after forgetting to do my home work the night before because I was so busy baking (good start to the new term?) and I think (and hope) they went down very well, everyone seemed to like them which was a good thing although I did have a dream the night before that I ended up poisoning everyone in my class with my horrid baking, luckily this didn't happen! 

I had a very big realisation on the weekend which I thought I would share just in case anyone else was as stupid as me and has been making this mistake. I use a lot of American recipes when I'm baking and almost every recipe calls for baking soda. Well, I have now been searching grocery stores for baking soda for about a year without any luck! I usually end up trying to find a different recipe or using double the amount of baking powder instead. This weekend after nearly refusing another recipe due to the fact that it called for baking soda and I still could not find any I realised that baking soda and bicarbonate of soda ARE THE SAME THING! Now I know this I realise it was probably the stupidest mistake of my whole life but it still caused me a lot of pain and trouble over the years and I thought on the off chance that anyone else is making this mistake I would share my story. 

Okay, now that embarrassment is over, here is the recipe! Enjoy! 


Milk Chocolate and Walnut Cookies - adapted from All Recipes

Ingredients:
- 226 grams of butter (1 cup)
- 1 cup of caster sugar
- 1 cup of light brown soft sugar
- 2 eggs
- 3 cups of plain flour
- 1 teaspoon of baking soda (or bicarbonate of soda)
- 2 teaspoons of hot water
- 1/2 teaspoon of salt
- 2 cups of milk chocolate chips
- 1 cup of finely chopped walnuts

Method: 
1. Preheat the oven to 175 degrees C (350 degrees F)
2. Cream together the butter caster sugar and light brown soft sugar.
3. Beat in the eggs one at a time then add the vanilla extract.
4. Dissolve the baking soda in the hot water and add to the mixture along with the salt.
5. Stir in the flour then gradually add the chocolate chips and walnuts.
6. Drop spoonfull's onto an ungreased baking tray making sure to space them far apart (they really spread out!)
7. Bake for 10-12 minutes until the edges turn golden brown.

Love Scarlett. 


The Perfect Chocolate Chip - White Chocolate and Cranberry


Well, I’m officialy back at school! Which is weird and a little scary but hopefully will be very good in the end! On my second day back my new form teacher announced something called ‘form baking’ which is where our whole form takes turns baking things for our weekly form period. I was, of course, very excited by this idea and immediately offered to bake for our first form period! Form period is on Tuesday and I’ve decided to bake chocolate chip biscuits in an attempt to bake my way to some new friends!

Finding the perfect chocolate chip biscuit recipe is definitely a challenge as there are SO many different kinds. But after lots of searching I think I may have found my perfect recipe. If you’ve ever had Millie’s Cookies  before these biscuits come out pretty similar to them and are VERY yummy. I have three different chocolate chip recipes to share over the next few posts and here is the first and my personal favourite – white chocolate and cranberry! Enjoy.


White Chocolate and Cranberry Cookie - adapted from All Recipes

Ingredients:
- 226 grams of butter (1 cup)
- 1 cup of caster sugar
- 1 cup of light brown soft sugar
- 2 eggs
- 3 cups of plain flour
- 1 teaspoon of baking soda (or bicarbonate of soda)
- 2 teaspoons of hot water
- 1/2 teaspoon of salt
- 2 cups of white chocolate chips
- 1 cup of dried cranberry's 

Method:
1. Preheat the oven to 175 degrees C (350 degrees F)
2. Cream together the butter caster sugar and light brown soft sugar.
3. Beat in the eggs one at a time then add the vanilla extract.
4. Dissolve the baking soda in the hot water and add to the mixture along with the salt.
5. Stir in the flour then gradually add the chocolate chips and cranberry's.
6. Drop spoonfull's onto an ungreased baking tray making sure to space them far apart (they really spread out!)
7. Bake for 10-12 minutes until the edges turn golden brown.

Love Scarlett.


Saturday

5 Minute Peanut Butter Fudge Recipe


Lately I've definitely been favouring easy recipes and after the banana ice cream recipe this fudge is definitely the easiest thing I've ever baked! I don't think you can even really call it baking as all it includes is microwaving and stirring! While we were in Cornwall I got it into my head that I needed to make some fudge while we were there (it was either fudge or pastys). I chose a traditional fudge recipe and set about boiling and stirring. Although it felt like I was boiling and stirring and stirring and boiling for HOURS - the fudge still didn't set. It was very sad. 

However in my sadness I stumbled across this recipe and I'm pretty sure I have never tried yummier fudge in my life! And it only takes 5 minutes. It is quite literally a miracle!

5 Minute Peanut Butter Fudge Recipe - (originally from Joy of Baking)

Ingredients:
- 1 cup of smooth peanut butter (240ml) 
- 230g of slightly salted butter (1 cup)
- 1/4 teaspoon of salt
- 1 teaspoon of vanilla extract
- 450g icing sugar (4 cups)

Step One: Strangely, the hardest part of this recipe is lining the tin! The fudge is very squidgy and formed by the time you put it in the tin so you have to make sure your lining is well stuck down. You can use greaseproof paper or tin foil and the recipe recommends an 8x8inch tin. I lined my tin with butter before greaseproof paper to make sure the paper wouldn't move around when I put the fudge in. 
Step Two: Place the peanut butter, butter and salt in a large microwaveable bowl. Microwave for two minutes on high then stir until the ingredients are combined. Continue to microwave and stir until all the ingredients are melted. 
Step Three: Stir in the vanilla extract and icing sugar until all ingredients are combined.
Step Four: Spread the fudge into the prepared tin and use a spatula to smooth the top over.
Step Five: Place in the fridge and chill for at least two hours (but the longer you keep it in the harder it will be)
Step Six: Enjoy your DELICIOUS fudge. 


Even if you've never made fudge before, or even if you've never baked before, I would seriously recommend trying this recipe, it's fun, quick, easy and I promise you that you will never be more popular than after bringing out a bowl of this fudge. 

Happy Saturday! 
Love Scarlett. 

Thursday

One Ingredient Banana Ice Cream Recipe


Okay, a lot of recipe blog addicts out there may already know this recipe but if you don't can I just prepare you to have your mind completely blown. At first you will 100% completely not believe this is going to work but TRUST ME it works ever single time. I don't even like bananas that much but this banana ice cream is my family's new addiction. It's yummy, creamy, custardy and just generally amazing. 


Step Two: Pop the banana coins into the freezer for two - three hours.

Step Three: Place all the frozen coins into the blender (or food processor) and blend. This step is magic! In a few seconds they will go from rock hard banana slices to crumbs and then magically turn into thick, rich, creamy ice cream.


If you want your ice cream a little chunkier like the picture above you can take it out of the blender while there are still some pieces in it. The longer you blend the smoother and creamier the ice cream will be. 


This is what my ice cream looked like after a few more seconds in the blender and personally I prefer it this way. 

Once this process is over, chances are your ice cream is going to be pretty sloppy as the bananas have been out of the freezer for quite a while. We found it was best served after chilling in the freezer for a little while longer after we'd made it. But having said that the first batch we made we couldn't resist eating it straight away! 

The ice cream will last perfectly in the freezer so feel free to make as much as you want. But make sure you put a lid on whatever you are storing it in or else it might absorb the other smells from your freezer (my mum loves to keep fish in the freezer.)

The other amazing thing about this recipe is that you don't even need that many bananas. I used three bananas when I was making it and that made two whole bowls of ice cream (both the bowls from the pictures above). 

If you do try out the recipe please leave a comment to tell me how it went!

Love Scarly xx

Sunday

Knitting Cupcakes

Hey. I hope everyone is having a lovely Sunday and enjoying this awesome weather (I love the rain, it's perfect knitting weather.) What I am about to show you is probably one of my favourite things I have ever made in my life... KNITTING CUPCAKES!


That's right! I have come up with a recipe that mixes the two best things in the world world, no I'm not talking about Greys Anatomy and Ryan Gosling, I'm talking about knitting and cupcakes! To find out how to make these lovely cakes head over to Hello Giggles NOW!

Have a great week,
Scarlett x

Saturday

Did You Make That? Pyjama Party

As you already know, Did You Make That? is one of my all time favourite blogs and for the past few weeks Karen has been doing something truly amazing on her already amazing blog. She has been hosting an online Pyjama Party (the best kind of party) and encouraging the readers of her blog to sew there very own pair of pyjamas! I really wanted to join in but I think it would have meant I did 0 hours of revision a day so I have just been reading about it and dreaming of making my own one day. You can read all about the project here

Although I didn't get to make my own pair I was very kindly asked by Karen to do a special post for the day of the actual Pyjama Party and the exciting news is that that day is TODAY! My post is up now and it's a recipe for some very yummy Py-jammy dodgers (which are bascially just Jammy Dodgers but shh! don't tell) so head over to Did You Make That NOW and have  a look at all the amazing things Karen has been doing as well as my recipe. You can find the recipe by clicking HERE!  

Have a lovely weekend,
Scarlett x

D.I.Y. Chocolate Dipped Cupcakes


That's right people, you heard me, chocolate. dipped. cupcakes. They're amazing, they're delicious and they're super duper easy. So head over to Hello Giggles NOW to find out how to make them. 

Happy Weekend. 
Love Scarlett


Thursday

Cupcakes: Back to Basics

This post may seem completely useless to some of you but when it comes to baking cupcakes I find I so often stumble at the first step. I decide I want to make and decorate some cupcakes and even though I know all I want to bake is the simplest of cakes and frosting's I find myself spending hours googling, wondering whether I want vanilla or lemon, chocolate frosting or cream cheese icing, in the end I usually just give up from all the options and go watch Greys Anatomy. So, mostly to help me out, but hopefully to help some other people with the same problem, here is the most basic cupcake recipe and the most basic frosting recipe in the world. Enjoy! 

The Most Basic Cupcake: 


Ingredients (makes 12)
- 125g (4.5oz) of butter softened or cubed
- 125g (4.5oz) of caster sugar
- 125g (4.5oz) of self-raising flour
- 2 eggs
- 2 tablespoons of whole milk
Yummy Additions
- For vanilla - 1 teaspoon of vanilla essence
- For chocolate - 2 tablespoons of cocoa powder
- For lemon - the zest of one lemon

- Preheat the oven to 190 degree Celsius (375 degrees Fahrenheit)

Recipe
1. Beat together the butter and sugar until light and fluffy.
2. Add the eggs, flour and milk and the chocolate, vanilla or lemon if you choose. Beat until the mixture is smooth.
3. Put the mixture in paper cases and bake until the cakes have risen and a cocktail stick inserted in the middle comes out clean.
4. Standard cakes take 12-15 minutes and mini cakes take 10-12 minutes.
5. Remove cakes from the oven and transfer to a wire cooling rack.

The Most Basic Buttercream Frosting:


Ingredients (makes 12)
- 140g (4oz) of butter softened or cubed
- 280g (10oz) of icing sugar
- 1 tablespoon of milk (if needed)

Recipe: 
1. Beat the butter in a large bowl until soft. You can do this by hand or with an electric mixer or wisk.
2. Add half the icing sugar and beat until smooth.
3. Add the remaining icing sugar and beat until smooth and creamy.
4. If the mixture is too thick add the milk.
5. Stir in food colouring or flavouring if needed.

Tuesday

Teacup Lemon Mousse


A few nights ago while we were in the country my mum decided to have a little dinner party and asked me to make the pudding. I was very excited and accepted her offer straight away. If you follow me on twitter you may have seen this picture I posted of my mums immense teacup collection: 


I LOVE teacups and decided to use them in my desert and make lemon mousse in teacups! 


I used THIS Lemon Mousse recipe from BBC Good Food and I couldn't believe how easy it was and how DELICIOUS it was! I don't think I have ever had more compliments and it was my first ever time making mousse!


If you're ever in the mood for a light pudding I would really recommend lemon mousse as it's fun, delicious easy and pretty (that pretty much ticks all the boxes right?).  


I hope you had a lovely Bank Holiday and are enjoying the thunder. Oh and if anyone asks this isn't a blog about Lemon Mousse it's some very intense maths revision!

Love Scarlett. 


Related Posts Plugin for WordPress, Blogger...